Shopify Changed How Purchase Orders Work. Here’s the New Workflow.
Shopify has quietly overhauled how Purchase Orders work. If you’ve been using POs to manage your restocking, things look a bit different now. The estimated arrival date has moved. Receiving inventory has moved. And there’s a new step — creating a linked Transfer — that you can’t skip if you want your incoming inventory to show up correctly.
IFH: Inventory Forecasting Hero is one of the first apps to support this new workflow. When you export your reorder list from Inventory Forecasting Hero, it generates a CSV that’s already formatted and ready to upload directly into Shopify’s new PO import. And IFH: Inventory Forecasting Hero pulls incoming inventory from PO-linked Transfers to use in your forecasts — so your reorder quantities automatically account for stock that’s already on its way.
This post walks through what changed, why it matters, and exactly how to use the new workflow step by step.
How It Used to Work
The old system was straightforward. Inventory Transfers (shopify.com/admin/transfers) were for moving stock between your own warehouse locations — nothing to do with suppliers. The Purchase Order page (shopify.com/admin/purchase_orders) was where you’d place a restock order from an external supplier.
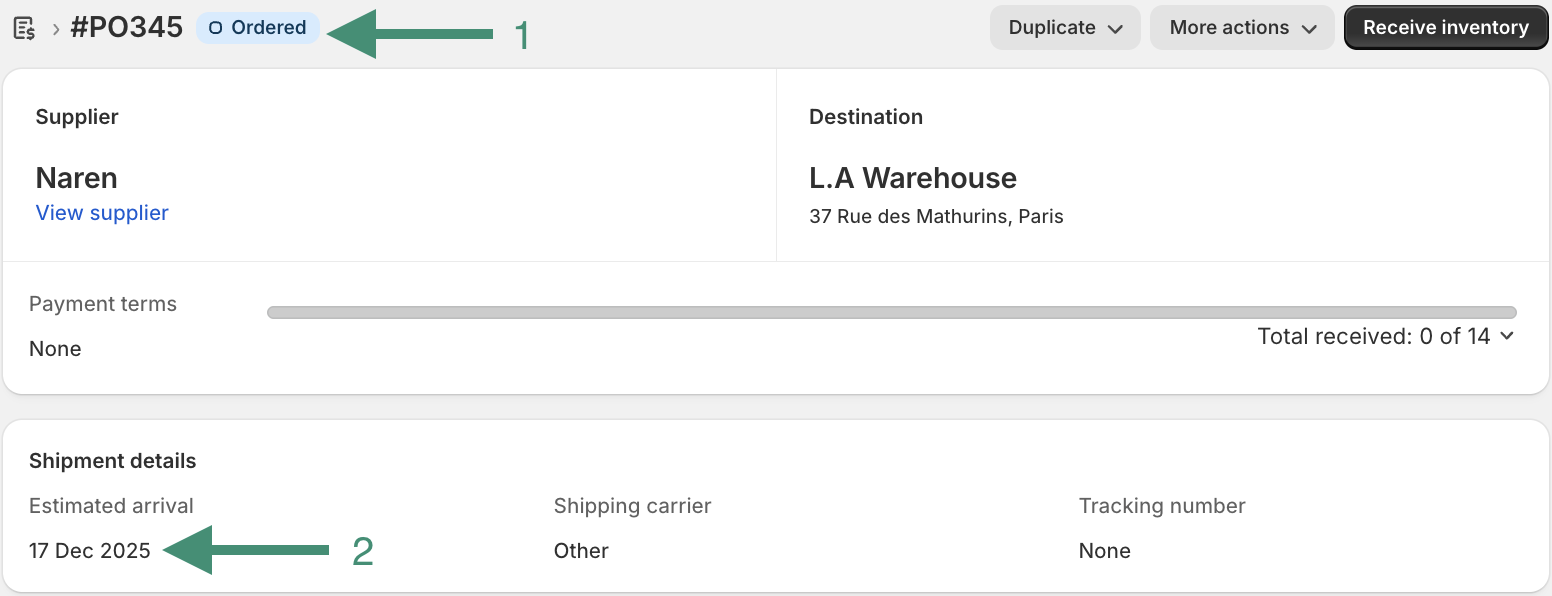
Once you marked a PO as Ordered and set an Estimated Arrival Date directly on the PO, Shopify treated that stock as incoming. When your shipment arrived physically, you’d mark the PO as received and the quantities would be added to your available inventory.
Simple. Everything happened on the PO page.
What Changed
Shopify has split the two jobs — the purchase document and the inventory movement — into separate tools.
The Purchase Order is now just a document. It records what you ordered, from whom, at what cost. That’s it.
The Transfer is now where all the inventory tracking happens — status changes, estimated arrival date, and receiving.
You can still create a PO from shopify.com/admin/purchase_orders. But you can no longer set an Estimated Arrival Date on the PO itself. Instead, once you mark the PO as Ordered, you create a Transfer and link it to that PO. The Estimated Arrival Date lives on the linked Transfer. And when your stock arrives, you receive it from the Transfer page — not the PO page.
One genuine improvement in this update: Shopify now lets you populate a Purchase Order by importing a CSV file instead of searching and adding products one by one. For stores with large orders, this is a real time saver.
Step-by-Step Walkthrough
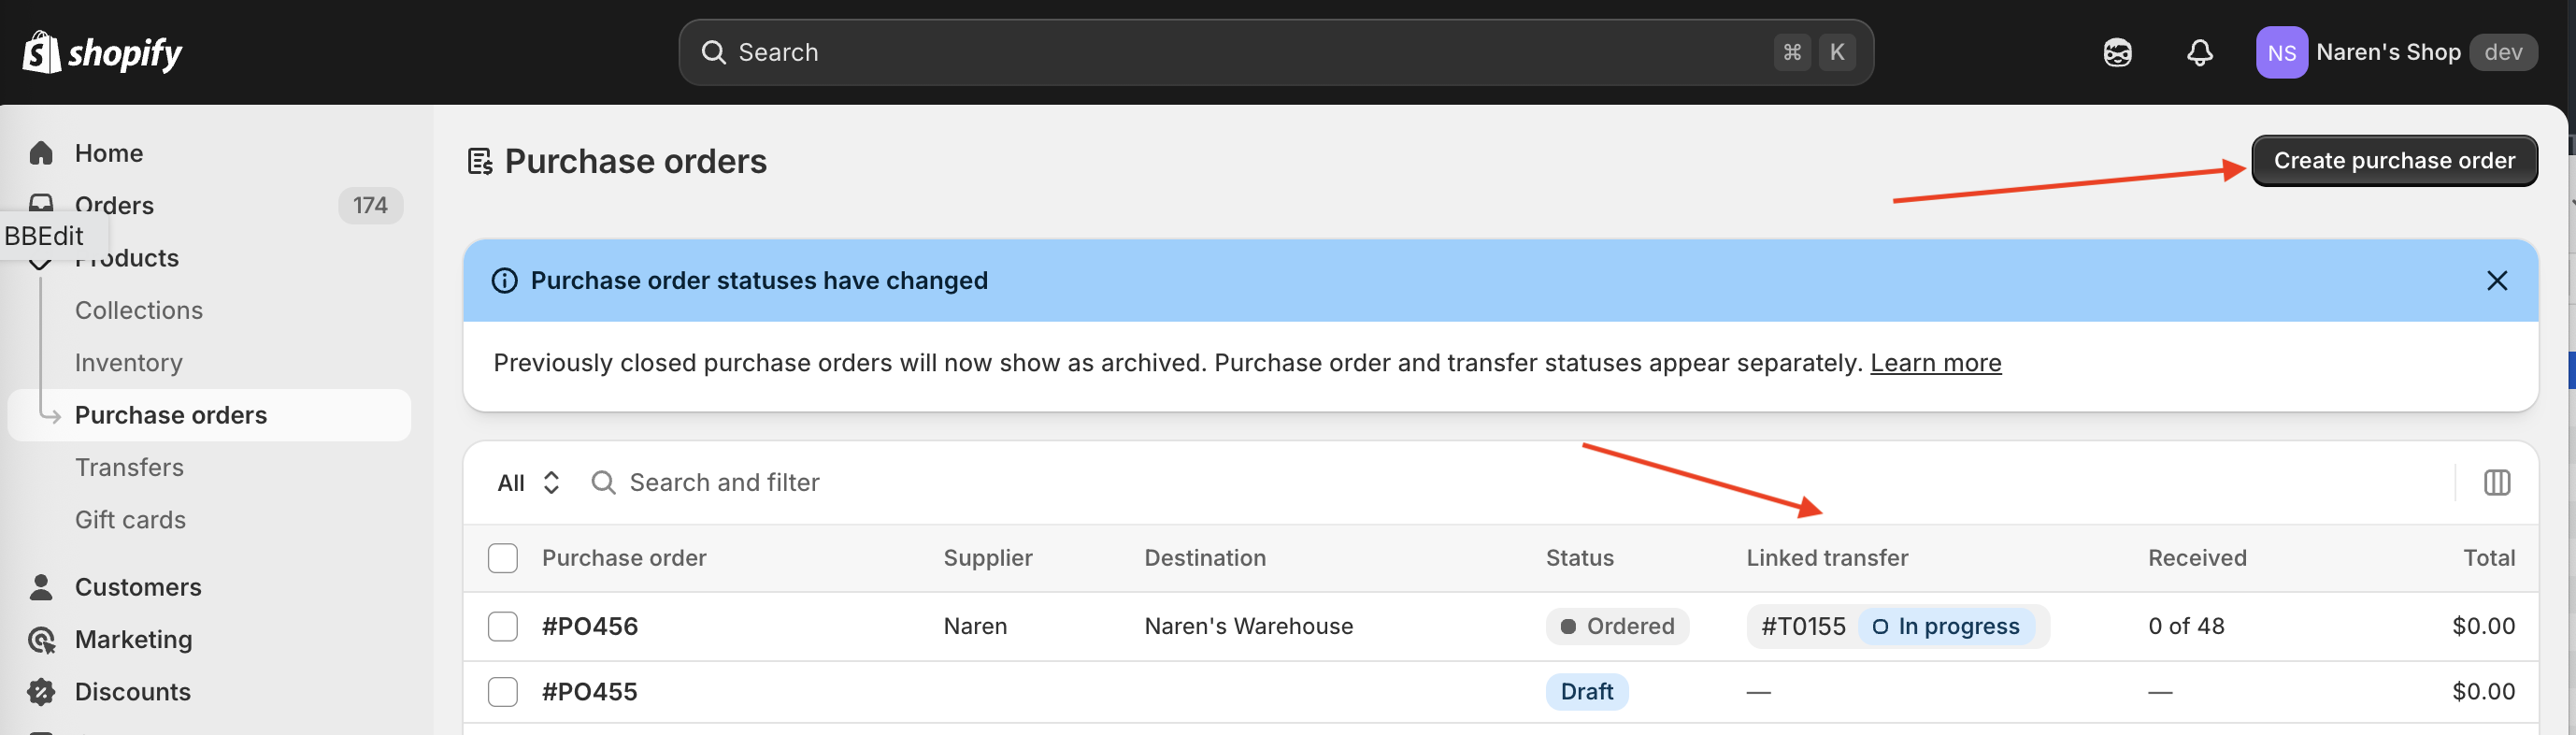
Step 1: Create a Purchase Order
Go to shopify.com/admin/purchase_orders and click Create purchase order.
You’ll know you have access to the new workflow if you can see a Linked transfer column on the Purchase Orders list page.
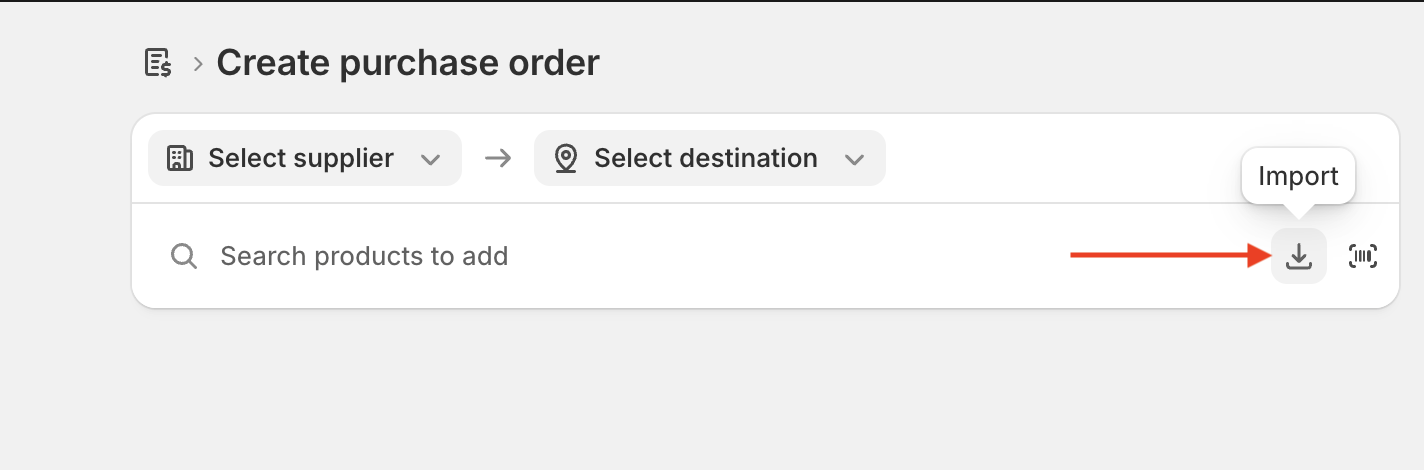
Step 2: Import Your Products via CSV
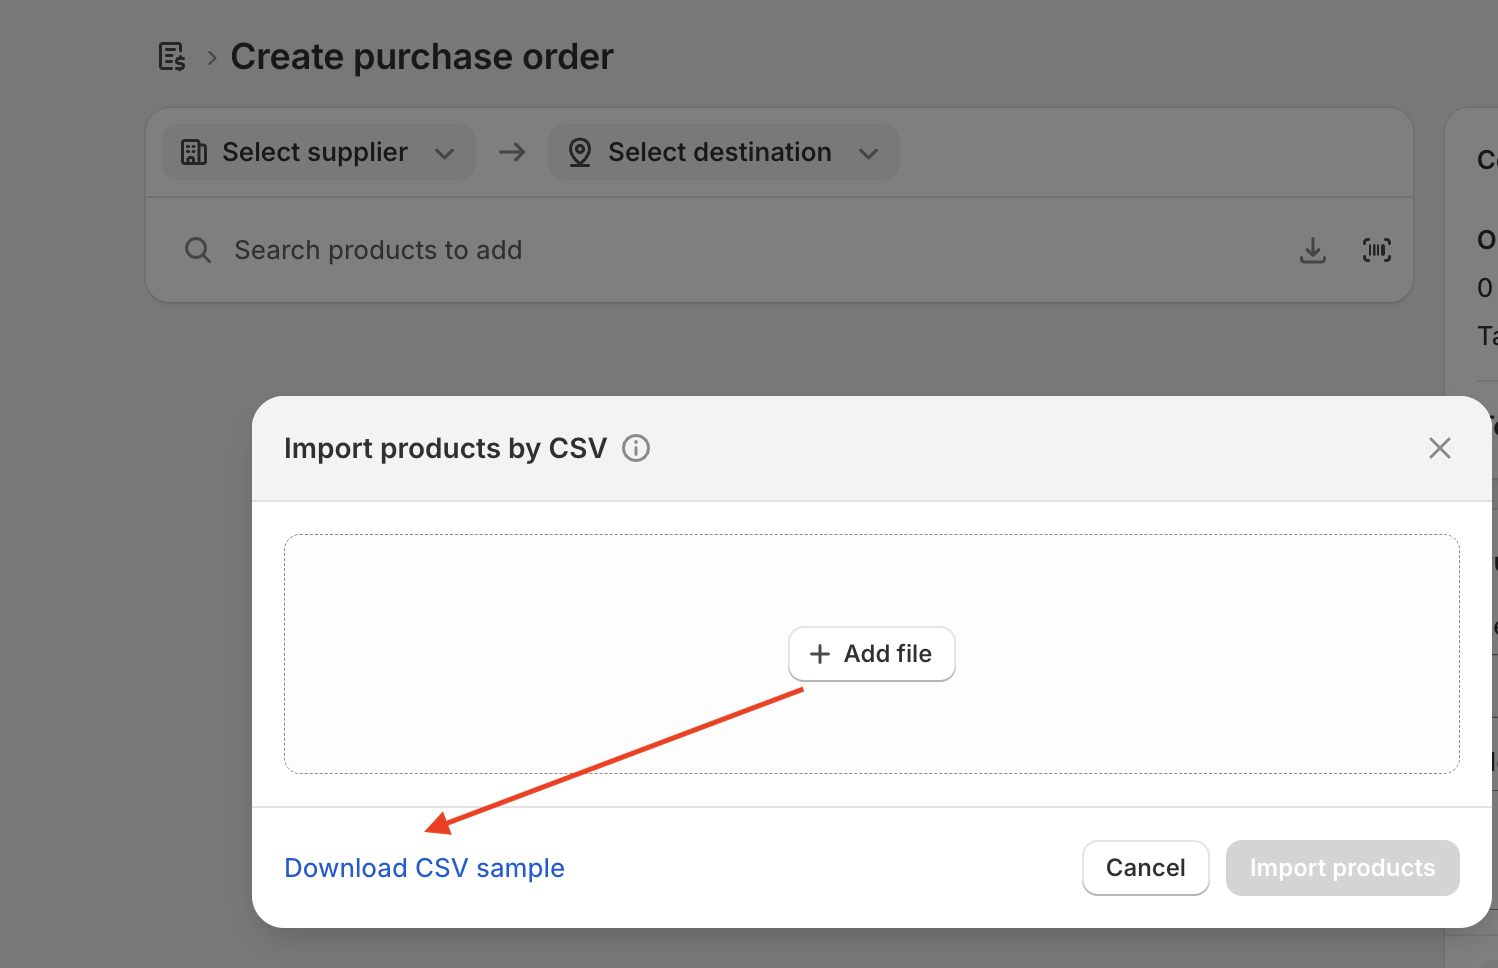
Instead of searching for products one by one, click the Import icon (the download arrow) in the search bar at the top of the new PO screen. This opens the CSV import dialog.
Download the CSV sample from the import dialog if you need a starting point. The required columns are:
| Column | Notes |
|---|---|
| SKU | Must be unique per variant for the import to work |
| Barcode | Optional if SKU is present |
| Supplier SKU | Your supplier’s reference code |
| Quantity | Units to order |
| Cost | Cost per unit |
| Tax | Tax rate % |
Important: This CSV import only works if each variant in your order has a unique SKU. If you have variants without SKUs, you’ll need to add them in Shopify first.
Bonus tip: You can add extra columns to the file and the import won’t break. IFH: Inventory Forecasting Hero adds Product Name and Variant Name to its export to make the file easier to read and verify before uploading. Shopify just ignores any columns it doesn’t recognise.
Download IFH: Inventory Forecasting Hero Purchase Order CSV template
Step 3: Select Supplier, Destination, and Mark as Ordered
Once your products are imported, select your Supplier and Destination warehouse at the top of the PO. Review the quantities and costs, then click Mark as ordered.
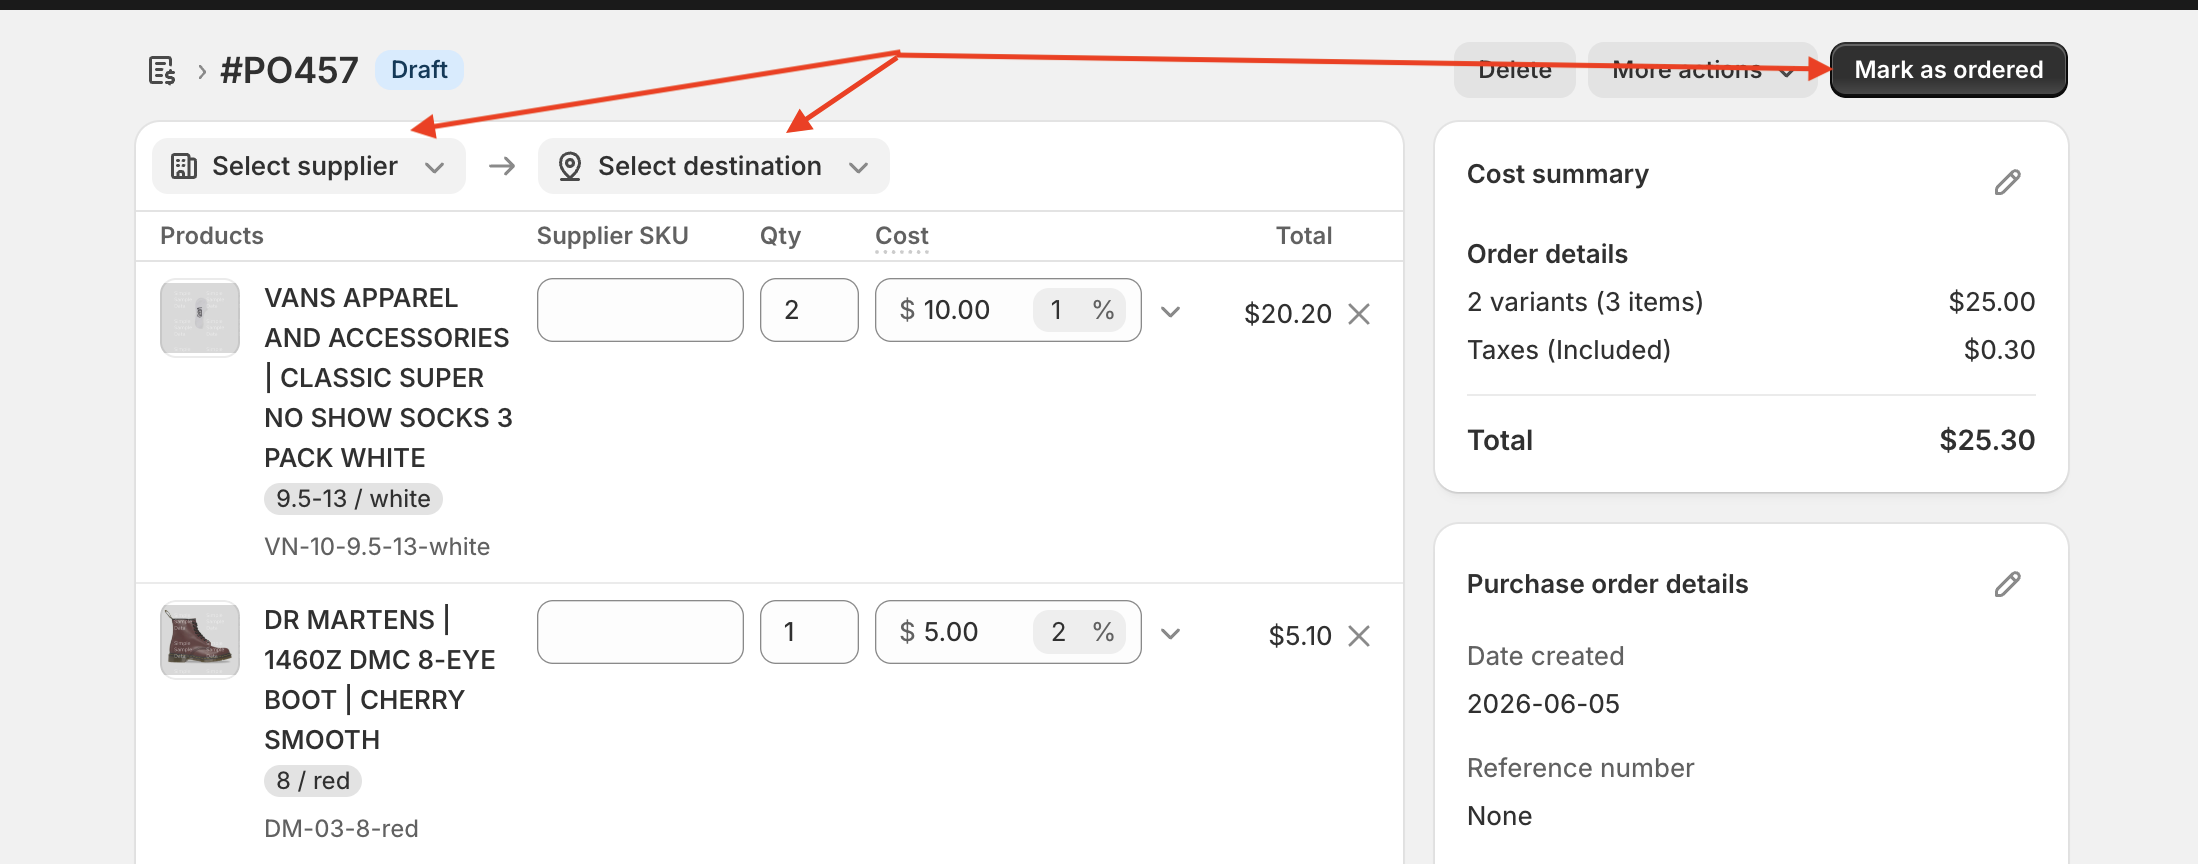
Step 4: Create a Transfer and Link It to the PO
This is the new step that didn’t exist before. Don’t skip it.
Once the PO is marked as Ordered, you’ll see a Create transfer button appear in the top right. Click it. Shopify will create a new Transfer and automatically link it to your PO — the products, quantities, supplier, and destination are all pre-populated. You don’t need to enter anything manually.
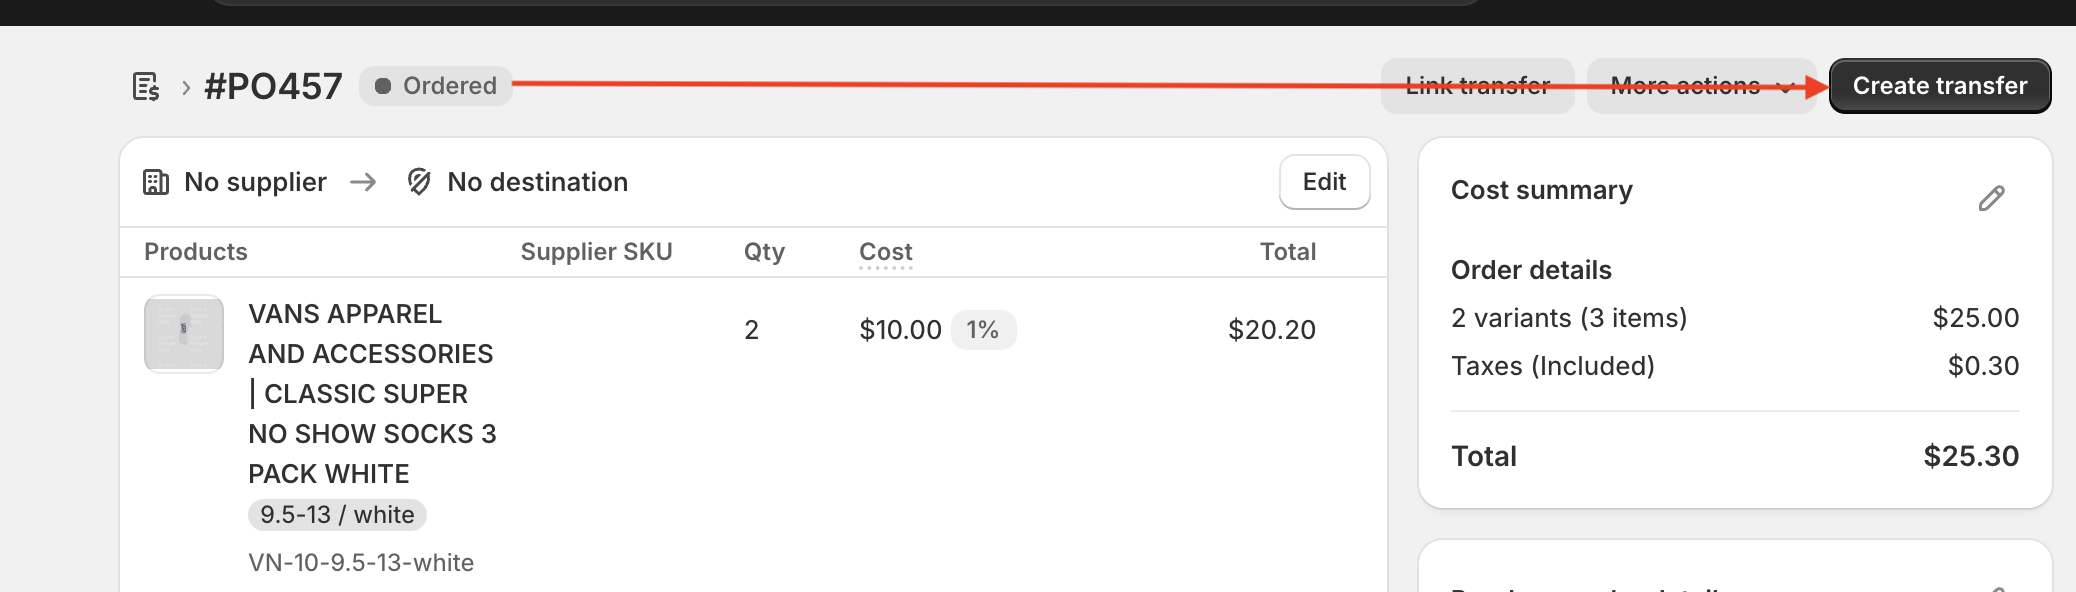
The newly created Transfer will show your PO number linked at the bottom, confirming the connection.
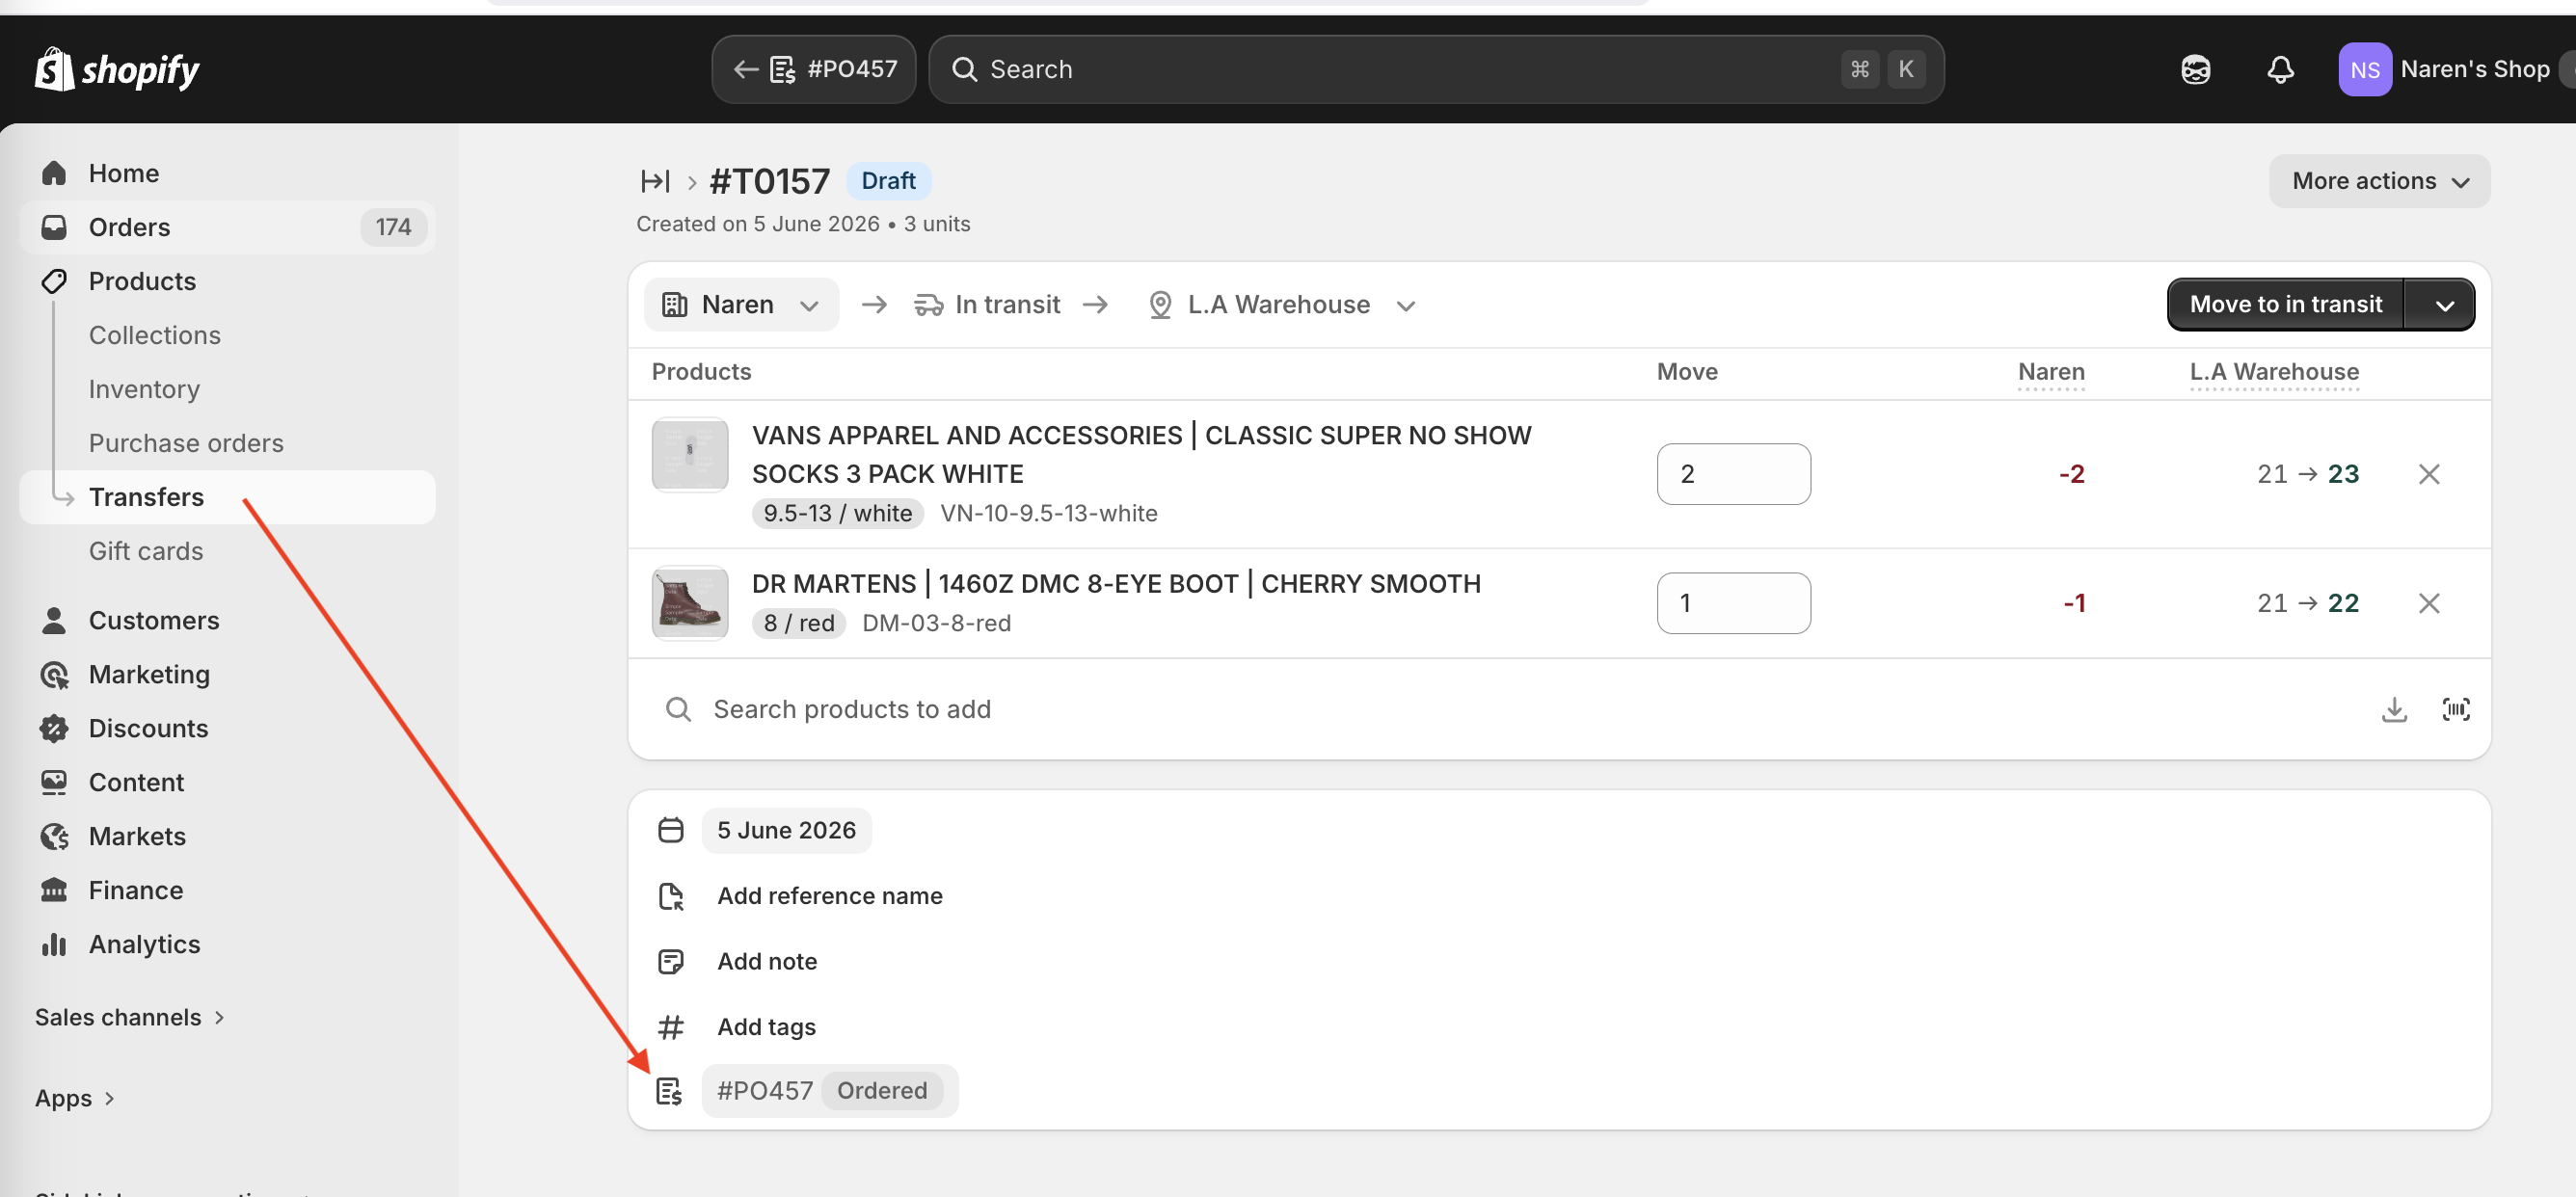
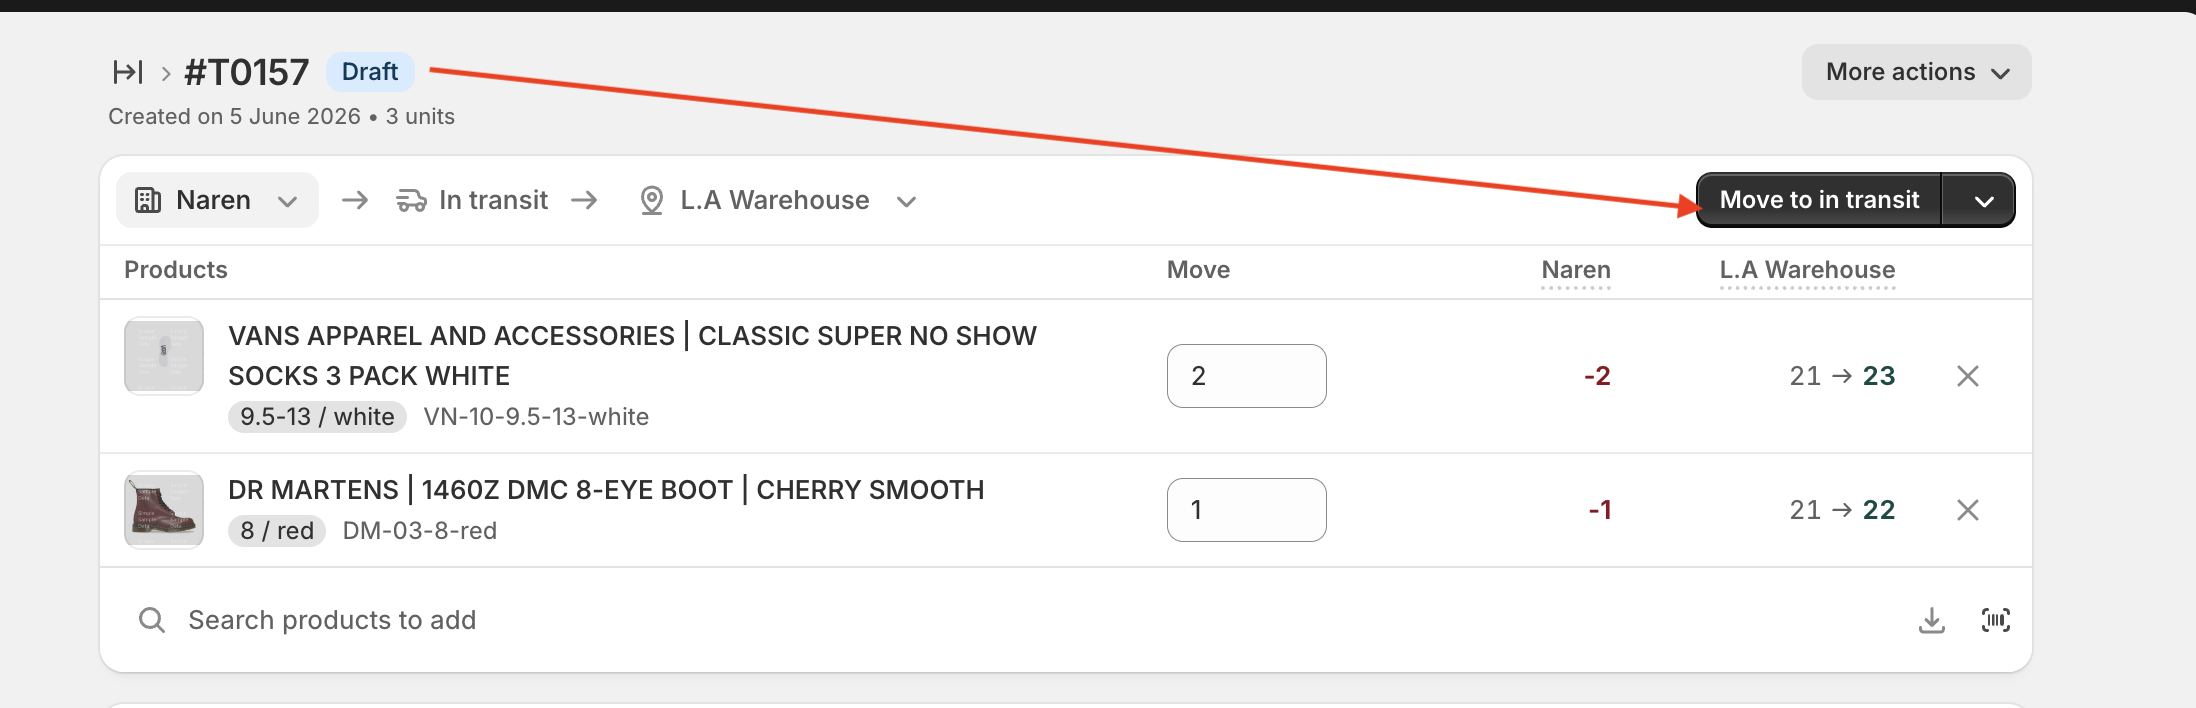
Step 5: Move the Transfer to “In Transit”
Once your supplier has actually shipped the order, come back to the Transfer and click Move to in transit.
This is the step that marks the inventory as “incoming” in Shopify. Until you do this, the stock won’t show up on the Incoming tab of your product’s inventory page. If you use a forecasting app like IFH: Inventory Forecasting Hero, this is also what triggers the incoming inventory to be counted in your reorder calculations.
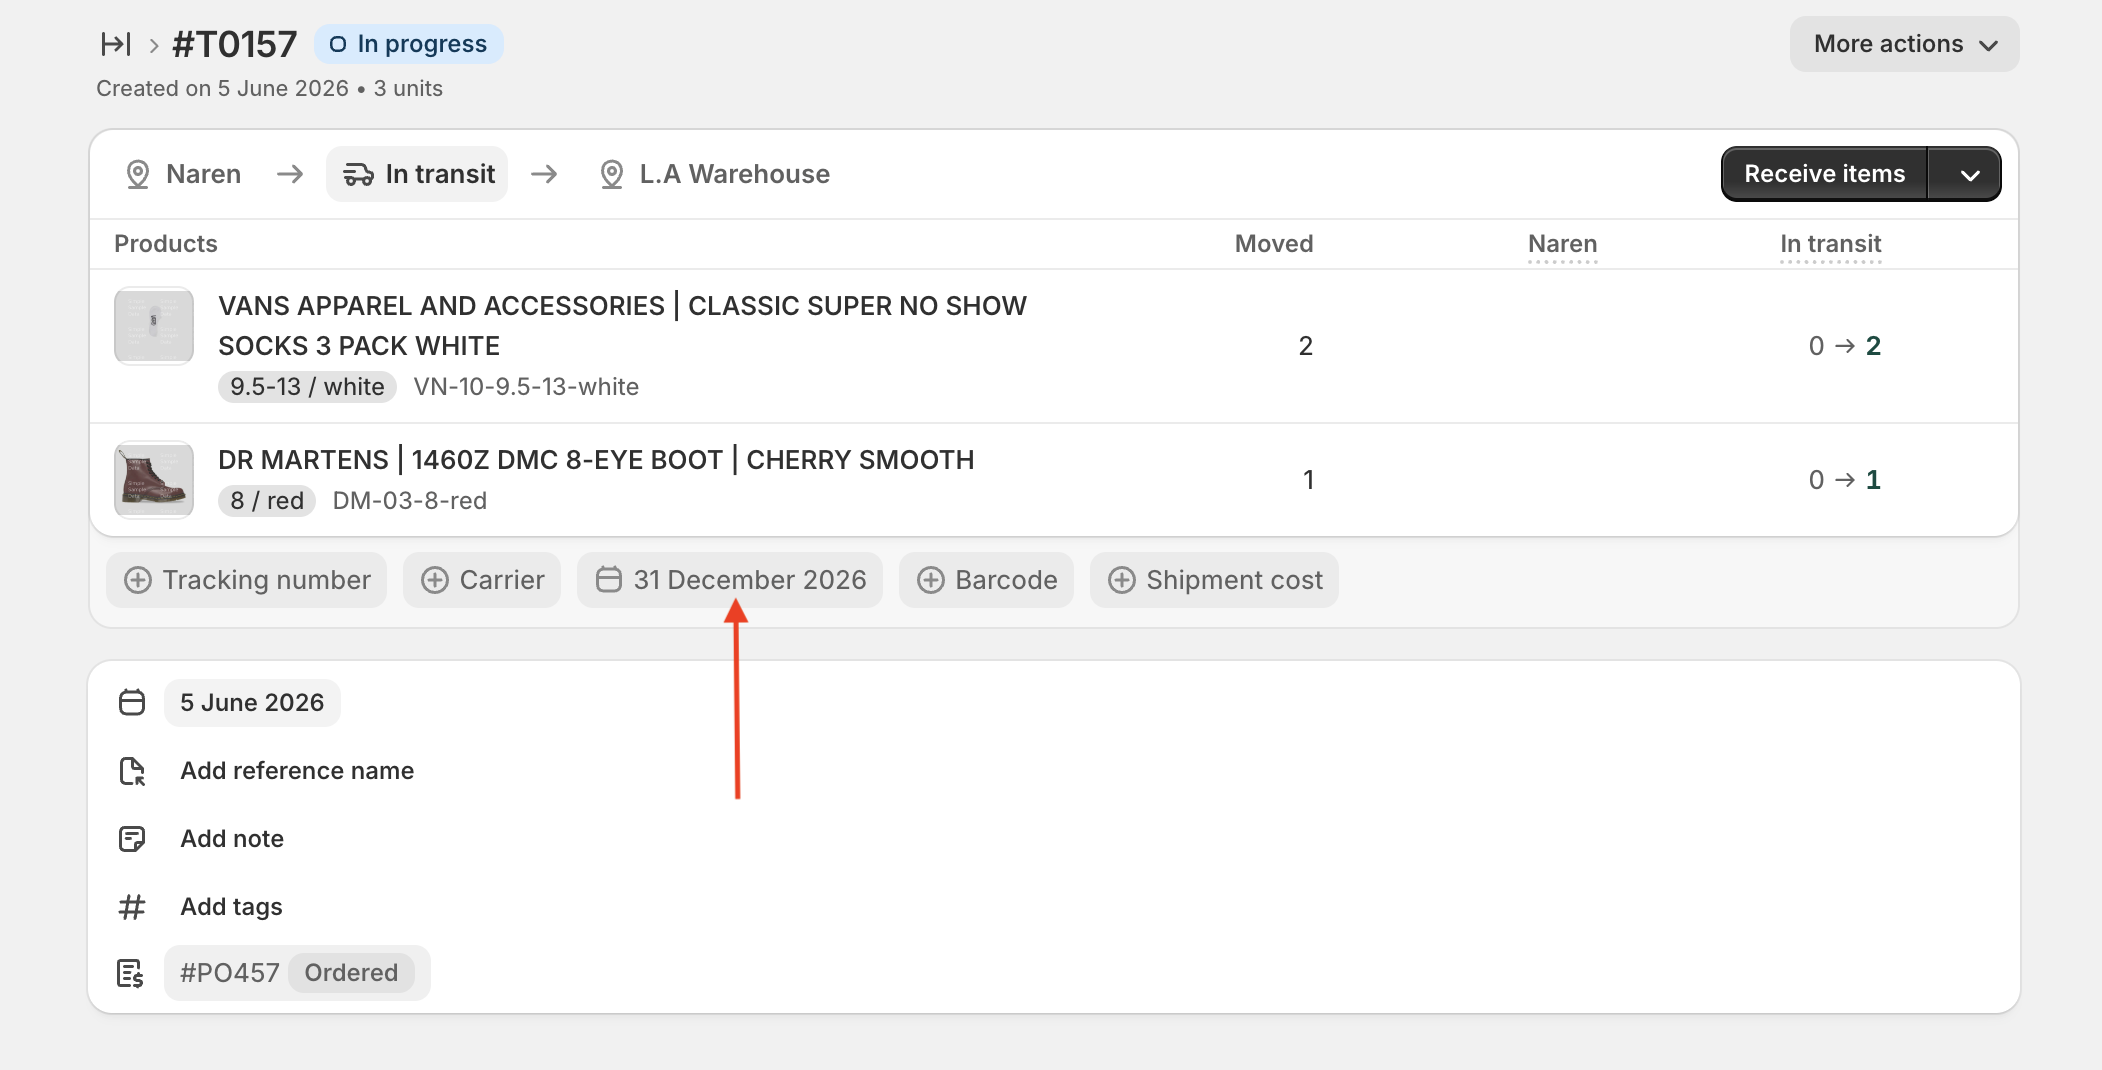
Step 6: Set the Estimated Arrival Date
Once the Transfer is In Progress, set the Expected arrival date. You’ll find it as a pill/button below the product list, on the same row as Tracking number, Carrier, and Barcode.
Common mistake: There’s a date field at the bottom of the Transfer page that looks like a date picker — that’s the “Created At” date, not the arrival date. Don’t click that one. The Expected arrival field is in the shipment details row directly under your product list.
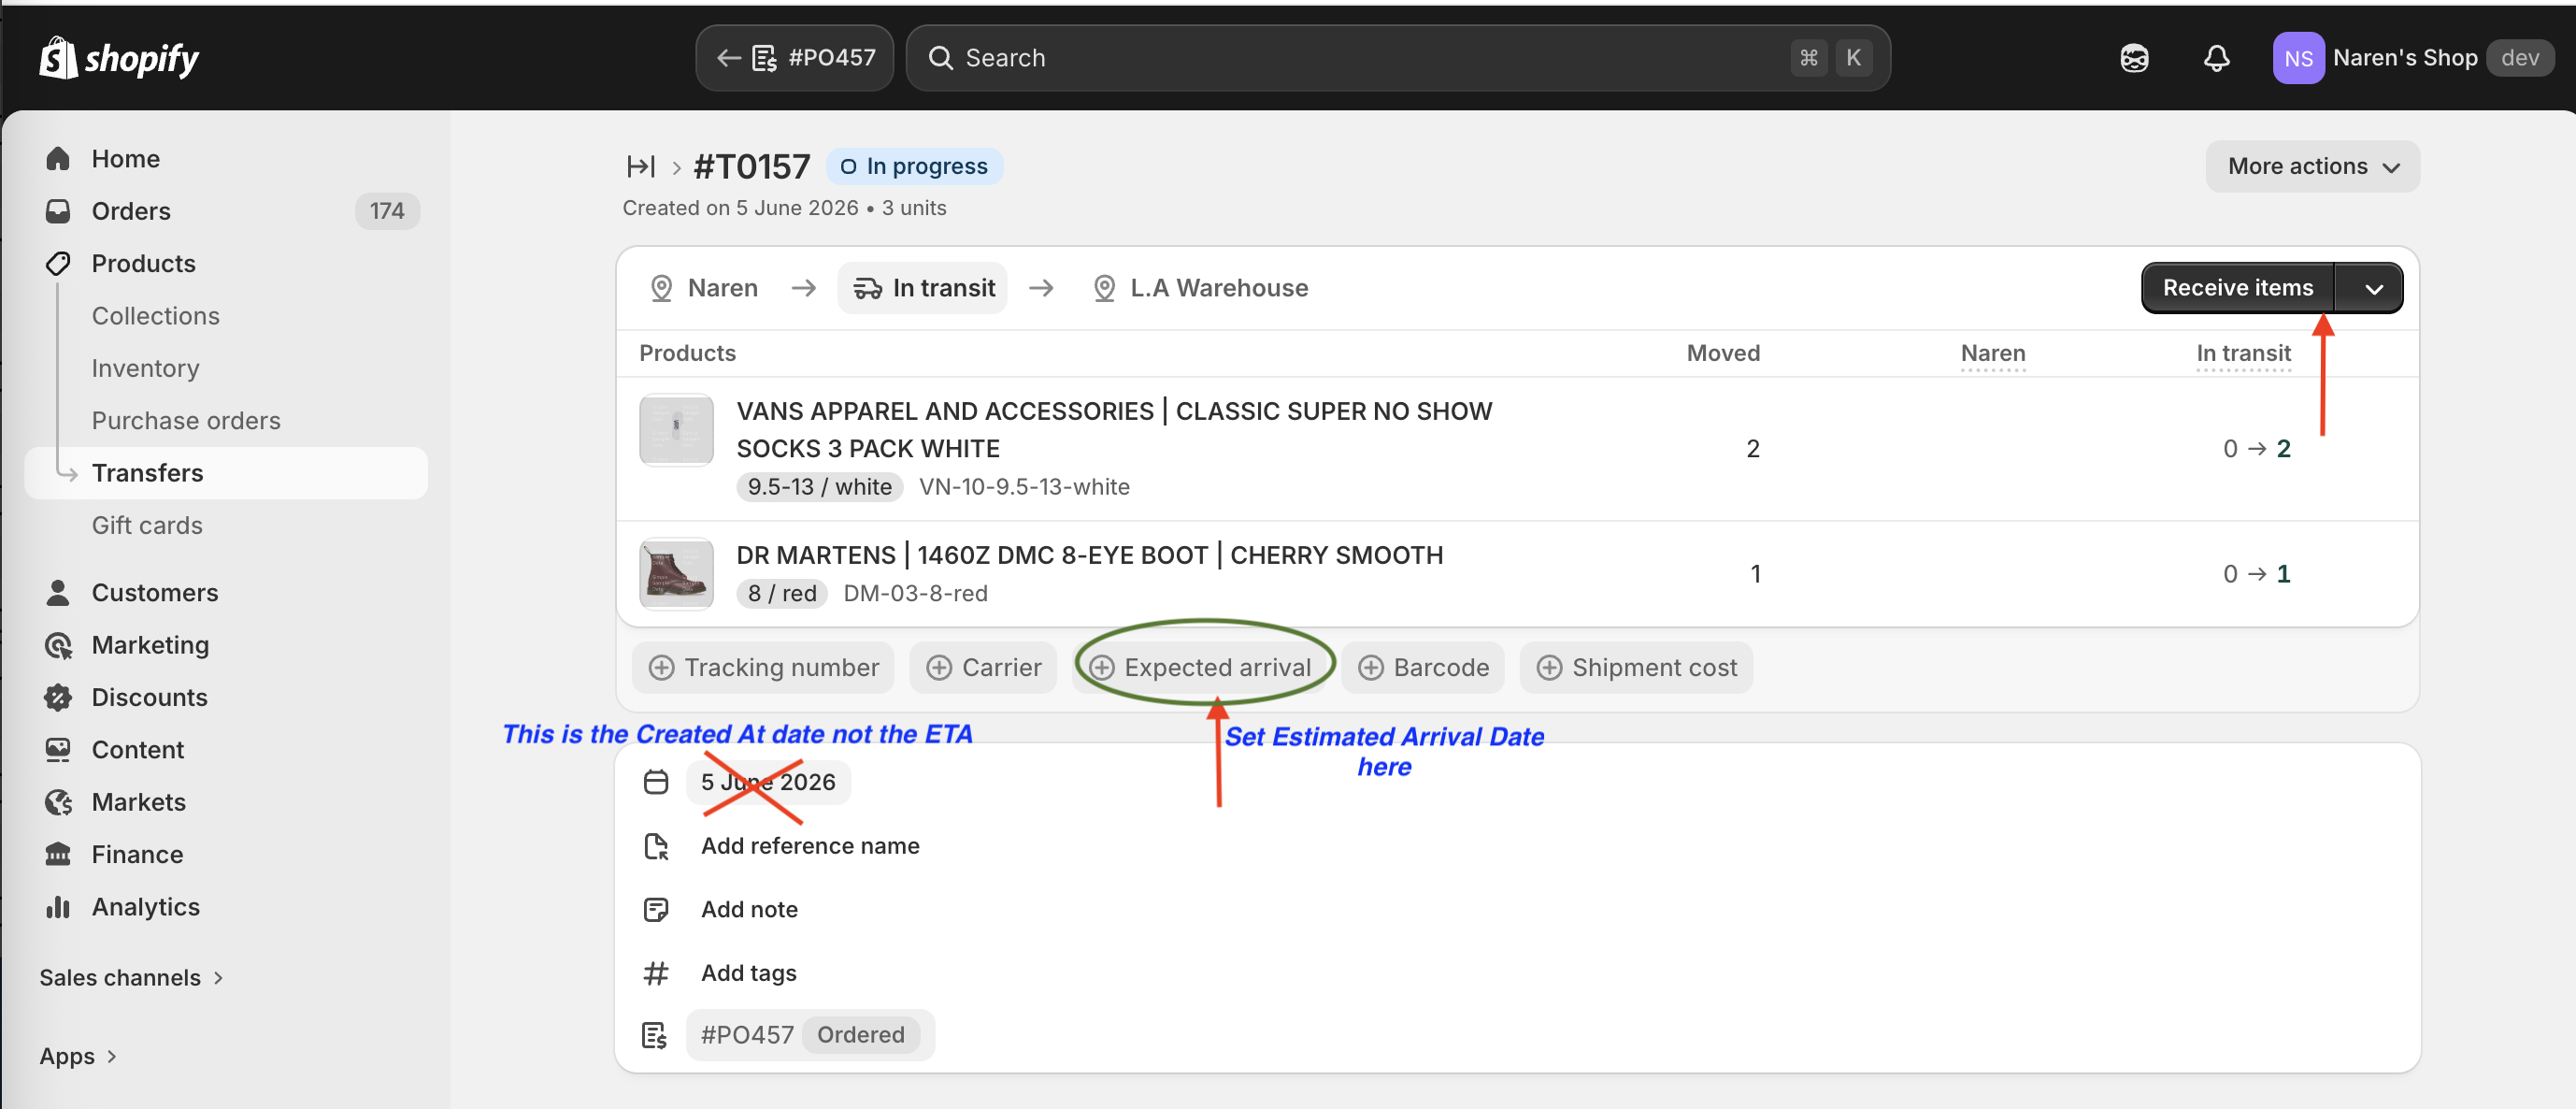
Once set, the date will show in the shipment details row.
This date matters beyond just tracking. Forecasting apps like IFH: Inventory Forecasting Hero use it to know exactly when to count the incoming inventory. Backorder and pre-order apps use it to tell customers when their item will ship. Get in the habit of always setting it.
Step 7: Add Tracking Details
While you’re on the Transfer, fill in the rest of the shipment details on the same row — tracking number, carrier, shipment cost, barcode. These are all optional but useful to have in one place.
Summary: Old Workflow vs. New Workflow
| Old Workflow | New Workflow | |
|---|---|---|
| Estimated Arrival Date | Set on the Purchase Order | Set on the linked Transfer |
| Incoming inventory | Triggered by marking PO as Ordered | Triggered by moving Transfer to In Transit |
| Receiving inventory | Done from the PO page | Done from the Transfer page |
| Adding products to PO | Search manually | Search manually or import via CSV |
| PO and Transfer | Separate, unconnected | Linked — Transfer references the PO |
What This Means if You Use IFH: Inventory Forecasting Hero
IFH: Inventory Forecasting Hero is built around Shopify’s native inventory data. The app reads incoming inventory from PO-linked Transfers, so your forecast and reorder quantity suggestions automatically account for stock that’s already on the way. No double-ordering.
When you export a reorder list from IFH: Inventory Forecasting Hero, the CSV is already formatted to match Shopify’s import template — SKU, quantity, cost, and extra readable columns like product name and variant name. You can upload it directly into a new PO without touching the file.
FAQ
Why did Shopify change the Purchase Order workflow? The change separates the purchasing document from the inventory movement tracking. It gives more flexibility for stores that have complex receiving workflows — for example, partial shipments, or shipments that come through a 3PL before reaching a warehouse. The linked Transfer handles the physical inventory movement while the PO stays as the financial record.
What happens if I don’t create a linked Transfer? The inventory won’t be marked as incoming in Shopify. It won’t show on the Incoming tab of your product inventory page, and forecasting apps that read from Shopify’s incoming inventory data won’t see it either. You’ll also need to receive the inventory manually without a Transfer.
Does the CSV import work for all products? Only if each variant has a unique SKU set in Shopify. If a variant has no SKU, the import won’t be able to match it. Go to the product in Shopify Admin and add a SKU before trying the import.
Can I link an existing Transfer to a Purchase Order? Yes. On a PO marked as Ordered, you’ll also see a “Link transfer” option next to “Create transfer.” You can use this to link a Transfer you’ve already created separately.
Which apps support the new Shopify PO + Transfer workflow? IFH: Inventory Forecasting Hero is one of the first apps to support it. IFH: Inventory Forecasting Hero reads incoming inventory from PO-linked Transfers and exports reorder CSVs in the correct format for Shopify’s import.
Inventory Forecasting Hero does this automatically for your Shopify store. $25/month with a 30-day free trial.
Start Free Trial →